Saddened to hear about Stephen Hawking this morning.
While some may not agree with him on certain things, few can dispute his genius.
And the film of his life with Eddie Redmayne is an absolute blast.
Saddened to hear about Stephen Hawking this morning.
While some may not agree with him on certain things, few can dispute his genius.
And the film of his life with Eddie Redmayne is an absolute blast.

SONOMA, Calif., March 6, 2018 – Open Source Leadership Summit – The Cloud Native Computing Foundation® (CNCF®), which sustains and integrates open source technologies like Kubernetes® and Prometheus™, today announced that Kubernetes is the first project to graduate. To move from incubation to graduate, projects must demonstrate thriving adoption, a documented, structured governance process, and a strong commitment to community success and inclusivity.
Great news :) shows that Kubernetes is now considered more mature than previously and it definitely shows.

Let’s assume you have an application that runs happily on its own and is stateless. No problem. You deploy it onto Kubernetes and it works fine. You kill the pod and it respins, happily continuing where it left off.
Let’s add three replicas to the group. That also is fine, since its stateless.
Let’s now change that so that the application is now stateful and requires storage of where it is in between runs. So you pre-provision a disk using EBS and hook that up into the pods, and convert the deployment to a stateful set. Great, it still works fine. All three will pick up where they left off.
Now, what if we wanted to share the same state between the replicas?
For example, what if these three replicas were frontend boxes to a website? Having three different disks is a bad idea unless you can guarantee they will all have the same content. Even if you can, there’s guaranteed to be a case where one or more of the boxes will be either behind or ahead of the other boxes, and consequently have a case where one or more of the boxes will serve the wrong version of content.
There are several options for shared storage, NFS is the most logical but requires you to pre-provision a disk that will be used and also to either have an NFS server outside the cluster or create an NFS pod within the cluster. Also, you will likely over-provision your disk here (100GB when you only need 20GB for example)
Another alternative is EFS, which is Amazon’s NFS storage, where you mount an NFS and only pay for the amount of storage you use. However, even when creating a filesystem in a public subnet, you get a private IP which is useless if you are not DirectConnected into the VPC.
Another option is S3, but how do you use that short of using “s3 sync” repeatedly?
One answer is through the use of s3fs and sshfs
We use s3fs to mount the bucket into a pod (or pods), then we can use those mounts via sshfs as an NFS-like configuration.
The downside to this setup is the fact it will be slower than locally mounted disks.
So here’s the yaml for the s3fs pods (change values within {…} where applicable) — details at Docker Hub here: https://hub.docker.com/r/blenderfox/s3fs/
(and yes, I could convert the environment variables into secrets and reference those, and I might do a follow up article for that)
---
kind: Deployment
apiVersion: extensions/v1beta1
metadata:
  name: s3fs
  namespace: default
  labels:
    k8s-app: s3fs
  annotations: {}
spec:
  replicas: 1
  selector:
    matchLabels:
      k8s-app: s3fs
  template:
    metadata:
      name: s3fs
      labels:
        k8s-app: s3fs
    spec:
      containers:
      - name: s3fs
        image: blenderfox/s3fs
        env:
        - name: S3_BUCKET
          value: {...}
        - name: S3_REGION
          value: {...}
        - name: AWSACCESSKEYID
          value: {...}
        - name: AWSSECRETACCESSKEY
          value: {...}
        - name: REMOTEKEY
          value: {...}
        - name: BUCKETUSERPASSWORD
          value: {...}
        resources: {}
        imagePullPolicy: Always
        securityContext:
          privileged: true
      restartPolicy: Always
      terminationGracePeriodSeconds: 30
      dnsPolicy: ClusterFirst
      securityContext: {}
      schedulerName: default-scheduler
  strategy:
    type: RollingUpdate
    rollingUpdate:
      maxUnavailable: 25%
      maxSurge: 25%
  revisionHistoryLimit: 10
  progressDeadlineSeconds: 600
---
kind: Service
apiVersion: v1
metadata:
  name: s3-service
  annotations:
    external-dns.alpha.kubernetes.io/hostname: {hostnamehere}
service.beta.kubernetes.io/aws-load-balancer-connection-idle-timeout: "3600"
  labels:
    name: s3-service
spec:
  ports:
  - protocol: TCP
    name: ssh
    port: 22
    targetPort: 22
  selector:
    k8s-app: s3fs
  type: LoadBalancer
  sessionAffinity: None
  externalTrafficPolicy: Cluster
This will create a service and a pod
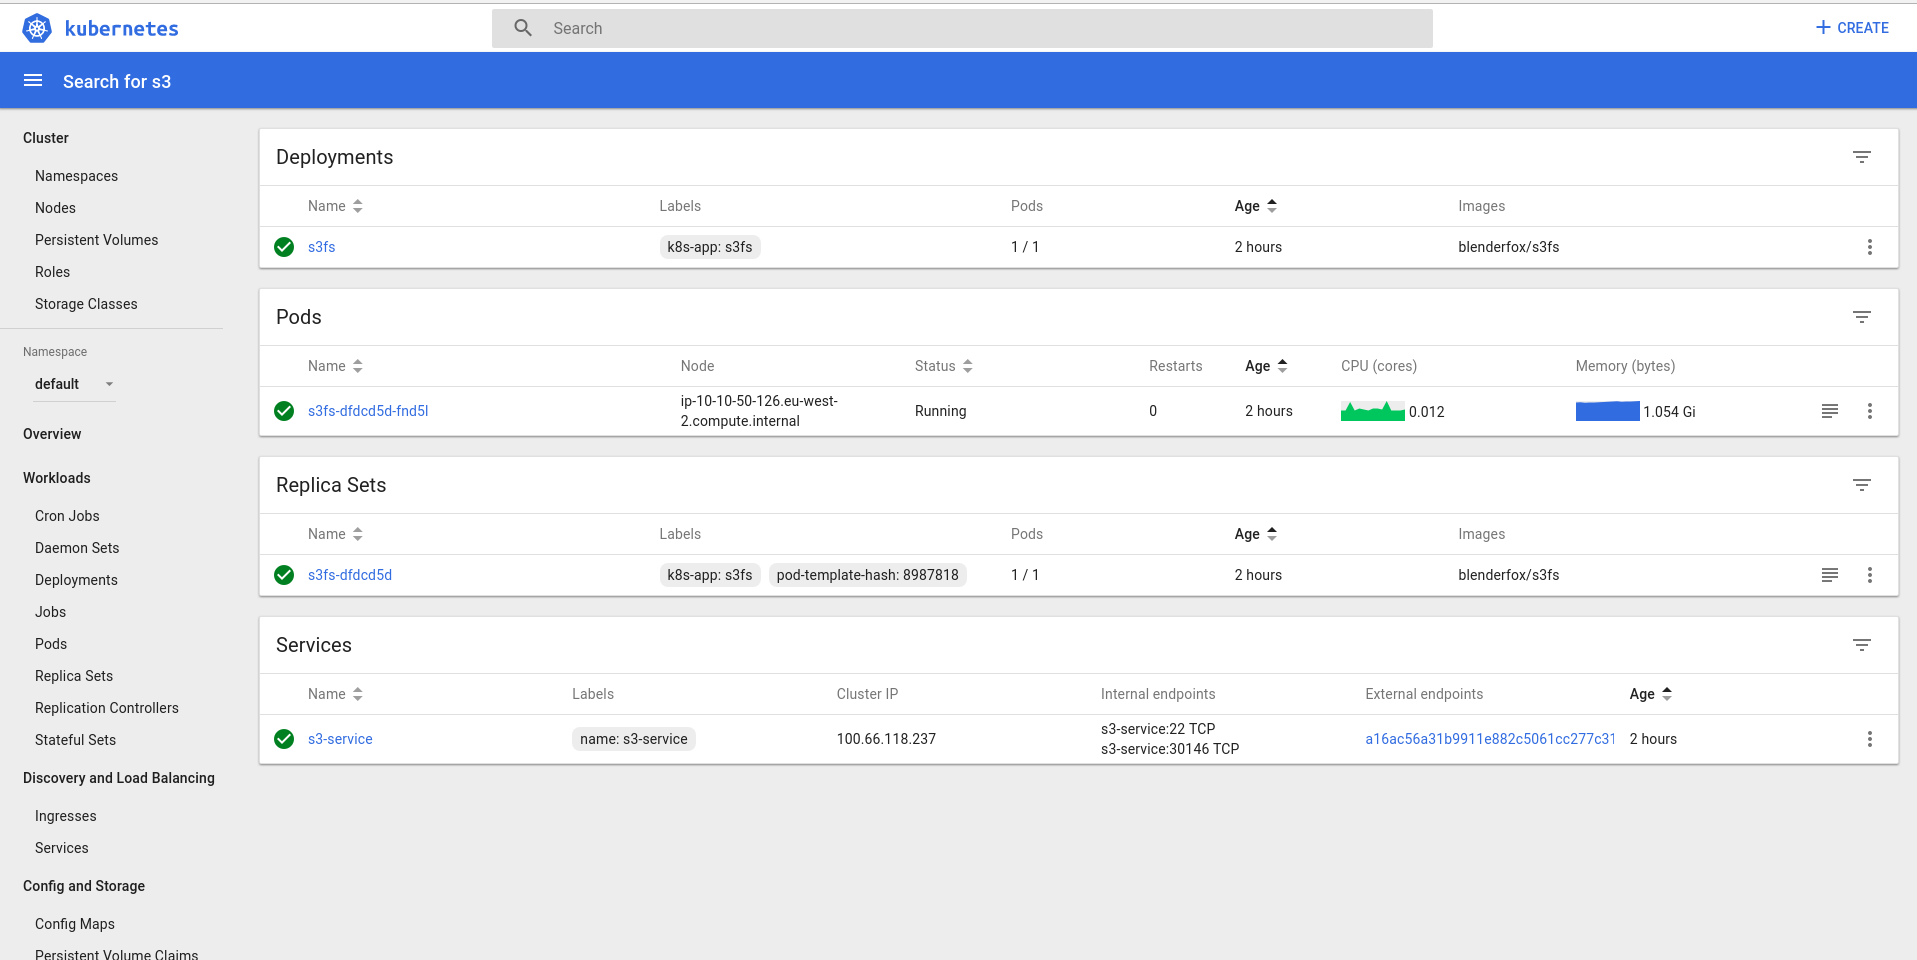
If you have external DNS enabled, the hostname will be added to Route 53.
SSH into the service and verify you can access the bucket mount
ssh bucketuser@dns-name ls -l /mnt/bucket/
(This should give you the listing of the bucket and also should have user:group set on the directory as “bucketuser”)
You should also be able to rsync into the bucket using this
rsync -rvhP /source/path bucketuser@dns-name:/mnt/bucket/
Or sshfs using a similar method
sshfs bucketuser@dns-name:/mnt/bucket/ /path/to/local/mountpoint
Edit the connection timeout annotation if needed
Now, if you set up a pod that has three replicas and all three sshfs to the same service, you essentially have an NFS-like storage.


Redid the last Week 9 run and made it through two intervals and just shy of the third.


Whilst finding vulnerabilities is a bad thing, having them found by white hat hackers is a good thing. Hackathons like this one prove that it can be constructive to get a group of them in to find and help fix vulnerabilities in your system before they are found in public and exploited to death before you have a chance to fix them.
The US Air Force’s second security hackathon has paid dividends… both for the military and the people finding holes in its defenses. HackerOne has revealed the results of the Hack the Air Force 2.0 challenge from the end of 2017, and it led to volunteers discovering 106 vulnerabilities across roughly 300 of the USAF’s public websites. Those discoveries proved costly, however. The Air Force paid out a total of $103,883, including $12,500 for one bug — the most money any federal bounty program has paid to date.


Finally finished Week 9. Interval three was a difficult one and my pace went from 5:30min/km to 7:33min/km >_<
Contemplating whether to move onto Week 10 or redo week 9 until I can meet the pace.

Having a master in a Kubernetes cluster is all very well and good, but if that master goes down the entire cluster cannot schedule new work. Pods will continue to run, but new ones cannot be scheduled and any pods that die will not get rescheduled.
Having multiple masters allows for more resiliency and can pick up when one goes down. However, as I found out, setting multi-master was quite problematic. Using the guide here only provided some help so after trashing my own and my company’s test cluster, I have expanded on the linked guide.
First add the subnet details for the new zone into your cluster definition — CIDR, subnet id, and make sure you name it something that you can remember. For simplicity, I called mine eu-west-2c. If you have a definition for utility (and you will if you use a bastion), make sure you have a utility subnet also defined for the new AZ
kops edit cluster --state s3://bucket
Now, create your master instance groups, you need an odd number to enable quorum and avoid split brain (I’m not saying prevent, and there are edge cases where this could be possible even with quorum). I’m going to add west-2b and west-2c. AWS recently introduced the third London AWS zone, so I’m going to use that.
kops create instancegroup master-eu-west-2b --subnet eu-west-2b --role Master
Make this one have a max/min of 1
kops create instancegroup master-eu-west-2c --subnet eu-west-2c --role Master
Make this one have a max/min of 0 (yes, zero) for now
Reference these in your cluster config
kops edit cluster --state=s3://bucket
  etcdClusters:
  - etcdMembers:
    - instanceGroup: master-eu-west-2a
      name: a
    - instanceGroup: master-eu-west-2b
      name: b
    - instanceGroup: master-eu-west-2c
      name: c
    name: main
  - etcdMembers:
    - instanceGroup: master-eu-west-2a
      name: a
    - instanceGroup: master-eu-west-2b
      name: b
    - instanceGroup: master-eu-west-2c
      name: c
    name: events
Start the new master
kops update cluster --state s3://bucket --yes
Find the etcd and etcd-event pods and add them to this script. Change “clustername” to the name of your cluster, then run it. Confirm the member lists include both two members (in my case it would be etc-a and etc-b)
ETCPOD=etcd-server-events-ip-10-10-10-226.eu-west-2.compute.internal
ETCEVENTSPOD=etcd-server-ip-10-10-10-226.eu-west-2.compute.internal
AZ=b
CLUSTER=clustername

kubectl --namespace=kube-system exec $ETCPOD -- etcdctl member add etcd-$AZ http://etcd-$AZ.internal.$CLUSTER:2380

kubectl --namespace=kube-system exec $ETCEVENTSPOD -- etcdctl --endpoint http://127.0.0.1:4002 member add etcd-events-$AZ http://etcd-events-$AZ.internal.$CLUSTER:2381

echo Member Lists
kubectl --namespace=kube-system exec $ETCPOD -- etcdctl member list

kubectl --namespace=kube-system exec $ETCEVENTSPOD -- etcdctl --endpoint http://127.0.0.1:4002 member list
(NOTE: the cluster will break at this point due to the missing second cluster member)
Wait for the master to show as initialised. Find the instance id of the master and put it into this script. Change the AWSSWITCHES to match any switches you need to provide to the awscli. For me, I specify my profile and region
The script will run and output the status of the instance until it shows “ok”
AWSSWITCHES="--profile personal --region eu-west-2"
INSTANCEID=master2instanceid
while [ "$(aws $AWSSWITCHES ec2 describe-instance-status --instance-id=$INSTANCEID --output text  | grep SYSTEMSTATUS | cut -f 2)" != "ok" ]
do
  sleep 5s
  aws $AWSSWITCHES ec2 describe-instance-status --instance-id=$INSTANCEID --output text  | grep SYSTEMSTATUS | cut -f 2
done
aws $AWSSWITCHES ec2 describe-instance-status --instance-id=$INSTANCEID --output text  | grep SYSTEMSTATUS | cut -f 2
ssh into the new master (or via bastion if needed)
sudo -i
systemctl stop kubelet
systemctl stop protokube
edit /etc/kubernetes/manifests/etcd.manifest and /etc/kubernetes/manifests/etcd-events.manifest
Change the ETCD_INITIAL_CLUSTER_STATE value from new to existing
Under ETCD_INITIAL_CLUSTER remove the third master definition
Stop the etcd docker containers
docker stop $(docker ps | grep "etcd" | awk '{print $1}')
Run this a few times until you get a docker error saying you need more than one container name
There are two volumes mounted under /mnt/master-vol-xxxxxxxx, one contains /var/etcd/data-events/member/ and one contains /var/etcd/data/member/ but it varies because of the id.
rm -r /mnt/var/master-vol-xxxxxx/var/etcd/data-events/member/
rm -r /mnt/var/master-vol-xxxxxx/var/etcd/data/member/
Now start kubelet
systemctl start kubelet
Wait until the master shows on the validate list then start protokube
systemctl start protokube
Now do the same with the third master
edit the third master ig to make it min/max 1
kops edit ig master-eu-west-2c --name=clustername --state s3://bucket
Add it to the clusters (the etcd pods should still be running)
ETCPOD=etcd-server-events-ip-10-10-10-226.eu-west-2.compute.internal
ETCEVENTSPOD=etcd-server-ip-10-10-10-226.eu-west-2.compute.internal
AZ=c
CLUSTER=clustername

kubectl --namespace=kube-system exec $ETCPOD -- etcdctl member add etcd-$AZ http://etcd-$AZ.internal.$CLUSTER:2380
kubectl --namespace=kube-system exec $ETCEVENTSPOD -- etcdctl --endpoint http://127.0.0.1:4002 member add etcd-events-$AZ http://etcd-events-$AZ.internal.$CLUSTER:2381

echo Member Lists
kubectl --namespace=kube-system exec $ETCPOD -- etcdctl member list
kubectl --namespace=kube-system exec $ETCEVENTSPOD -- etcdctl --endpoint http://127.0.0.1:4002 member list
Start the third master
kops update cluster --name=cluster-name --state=s3://bucket
Wait for the master to show as initialised. Find the instance id of the master and put it into this script. Change the AWSSWITCHES to match any switches you need to provide to the awscli. For me, I specify my profile and region
The script will run and output the status of the instance until it shows “ok”
AWSSWITCHES="--profile personal --region eu-west-2"
INSTANCEID=master3instanceid
while [ "$(aws $AWSSWITCHES ec2 describe-instance-status --instance-id=$INSTANCEID --output text  | grep SYSTEMSTATUS | cut -f 2)" != "ok" ]
do
  sleep 5s
  aws $AWSSWITCHES ec2 describe-instance-status --instance-id=$INSTANCEID --output text  | grep SYSTEMSTATUS | cut -f 2
done
aws $AWSSWITCHES ec2 describe-instance-status --instance-id=$INSTANCEID --output text  | grep SYSTEMSTATUS | cut -f 2
ssh into the new master (or via bastion if needed)
sudo -i
systemctl stop kubelet
systemctl stop protokube
edit /etc/kubernetes/manifests/etcd.manifest and /etc/kubernetes/manifests/etcd-events.manifest
Change the ETCD_INITIAL_CLUSTER_STATE value from new to existing
We DON’T need to remove the third master defintion this time, since this is the third master
Stop the etcd docker containers
docker stop $(docker ps | grep "etcd" | awk '{print $1}')
Run this a few times until you get a docker error saying you need more than one container name
There are two volumes mounted under /mnt/master-vol-xxxxxxxx, one contains /var/etcd/data-events/member/ and one contains /var/etcd/data/member/ but it varies because of the id.
rm -r /mnt/var/master-vol-xxxxxx/var/etcd/data-events/member/
rm -r /mnt/var/master-vol-xxxxxx/var/etcd/data/member/
Now start kubelet
systemctl start kubelet
Wait until the master shows on the validate list then start protokube
systemctl start protokube
If the cluster validates, do a full respin
kops rolling-update cluster --name clustername --state s3://bucket --force --yes

Kubernetes is an awesome piece of kit, you can set applications to run within the cluster, make it visible to only apps within the cluster and/or expose it to applications outside of the cluster.
As part of my tinkering, I wanted to setup a Docker Registry to store my own images without having to make them public via docker hub. Doing this proved a bit more complicated than expected since by default, it requires SSL which requires a certificate to be purchased and installed.
Enter Let’s Encrypt which allows you to get SSL certificates for free; and by using their API, you can set it to regularly renew. Kubernetes has the kube-lego project which allows this regular integration. So here, I’ll go through enabling an application (in this case, it’s a docker registry, but it can be anything).
First, lets ignore the lego project, and set up the application so that it is accessible normally. As mentioned above, this is the docker registry
I’m tying the registry storage to a pv claim, though you can modify this to tie to S3, instead etc.
---
kind: Deployment
apiVersion: extensions/v1beta1
metadata:
  name: registry
  namespace: default
  labels:
    name: registry
spec:
  replicas: 1
  selector:
    matchLabels:
      name: registry
  template:
    metadata:
      creationTimestamp:
      labels:
        name: registry
    spec:
      volumes:
      - name: registry-data
        persistentVolumeClaim:
          claimName: registry-data
      containers:
      - name: registry
        image: registry:2
        resources: {}
        volumeMounts:
        - name: registry-data
          mountPath: "/var/lib/registry"
        terminationMessagePath: "/dev/termination-log"
        terminationMessagePolicy: File
        imagePullPolicy: Always
      restartPolicy: Always
      terminationGracePeriodSeconds: 30
      dnsPolicy: ClusterFirst
      securityContext: {}
      schedulerName: default-scheduler
  strategy:
    type: Recreate
---
kind: Service
apiVersion: v1
metadata:
  name: registry
  namespace: default
  labels:
    name: registry
spec:
  ports:
  - protocol: TCP
    port: 9000
    targetPort: 5000
  selector:
    name: registry
  type: LoadBalancer
  sessionAffinity: None
  externalTrafficPolicy: Cluster
Once you’ve applied this, verify your config is correct by ensuring you have an external endpoint for the service (use kubectl describe service registry | grep "LoadBalancer Ingress"). On AWS, this will be an ELB, on other clouds, you might get an IP. If you get an ELB, CNAME a friendly name to it. If you get an IP, create an A record for it. I’m going to use registry.blenderfox.com for this test.
Verify by doing this. Bear in mind it can take a while before DNS records updates so be patient.
host $(SERVICE_DNS)
So if I had set the service to be registry.blenderfox.com, I would do
host registry.blenderfox.com
If done correctly, this should resolve to the ELB then resolve to the ELB IP addresses.
Next, try to tag a docker image of the format registry-host:port/imagename, so, for example, registry.blenderfox.com:9000/my-image.
Next try to push it.
docker push registry.blenderfox.com:9000/my-image
It will fail because it can’t talk over https
docker push registry.blenderfox.com:9000/my-image
The push refers to repository [registry.blenderfox.com:9000/my-image]
Get https://registry.blenderfox.com:9000/v2/: http: server gave HTTP response to HTTPS client
So let’s now fix that.
Now let’s start setting up kube-lego
Checkout the code
git clone git@github.com:jetstack/kube-lego.git
cd into the relevant folder
cd kube-lego/examples/nginx
Start applying the code base
kubectl apply -f lego/00-namespace.yaml
kubectl apply -f nginx/00-namespace.yaml
kubectl apply -f nginx/default-deployment.yaml
kubectl apply -f nginx/default-service.yaml
Open up nginx/configmap.yaml and change the body-size: "64m" line to a bigger value. This is the maximum size you can upload through nginx. You’ll see why this is an important change later.
kubectl apply -f nginx/configmap.yaml
kubectl apply -f nginx/service.yaml
kubectl apply -f nginx/deployment.yaml
Now, look for the external endpoint for the nginx service
kubectl describe service nginx -n nginx-ingress | grep "LoadBalancer Ingress"
Look for the value next to LoadBalancer Ingress. On AWS, this will be the ELB address.
CNAME your domain for your service (e.g. registry.blenderfox.com in this example) to that ELB. If you’re not on AWS, this may be an IP, in which case, just create an A record instead.
Open up lego/configmap.yaml and change the email address in there to be the one you want to use to request the certs.
kubectl apply -f lego/configmap.yaml
kubectl apply -f lego/deployment.yaml
Wait for the DNS to update before proceeding to the next step.
host registry.blenderfox.com
When the DNS is updated, finally create and add an ingress rule for your service:
---
kind: Ingress
apiVersion: extensions/v1beta1
metadata:
  name: registry
  namespace: default
  annotations:
    kubernetes.io/ingress.class: nginx
    kubernetes.io/tls-acme: 'true'
spec:
  tls:
  - hosts:
    - registry.blenderfox.com
    secretName: docker-tls
  rules:
  - host: registry.blenderfox.com
    http:
      paths:
      - path: "/"
        backend:
          serviceName: registry
          servicePort: 9000
status:
  loadBalancer:
    ingress:
    - {}
Look add the logs in nginx-ingress/nginx and you’ll see the Let’s Encrypt server come in to validate:
100.124.0.0 - [100.124.0.0] - - [19/Jan/2018:09:50:19 +0000] "GET /.well-known/acme-challenge/[REDACTED] HTTP/1.1" 200 87 "-" "Mozilla/5.0 (compatible; Let's Encrypt validation server; +https://www.letsencrypt.org)" 277 0.044 100.96.0.3:8080 87 0.044 200
And look in the logs on the kube-lego/kube-lego pod and you’ll see the success and saving of the secret
time="2018-01-19T09:49:45Z" level=info msg="requesting certificate for registry.blenderfox.com" context="ingress_tls" name=registry namespace=default
time="2018-01-19T09:50:21Z" level=info msg="authorization successful" context=acme domain=registry.blenderfox.com
time="2018-01-19T09:50:47Z" level=info msg="successfully got certificate: domains=[registry.blenderfox.com] url=https://acme-v01.api.letsencrypt.org/acme/cert/[REDACTED]" context=acme
time="2018-01-19T09:50:47Z" level=info msg="Attempting to create new secret" context=secret name=registry-tls namespace=default
time="2018-01-19T09:50:47Z" level=info msg="Secret successfully stored" context=secret name=registry-tls namespace=default
Now let’s do a quick verify:
curl -ILv https://registry.blenderfox.com
...
* Server certificate:
*  subject: CN=registry.blenderfox.com
*  start date: Jan 19 08:50:46 2018 GMT
*  expire date: Apr 19 08:50:46 2018 GMT
*  subjectAltName: host "registry.blenderfox.com" matched cert's "registry.blenderfox.com"
*  issuer: C=US; O=Let's Encrypt; CN=Let's Encrypt Authority X3
*  SSL certificate verify ok.
...
That looks good.
Now let’s re-tag and try to push our image
docker tag registry.blenderfox.com:9000/my-image registry.blenderfox.com/my-image
docker push registry.blenderfox.com/my-image
Note we are not using a port this time as there is now support for SSL.
BOOM! Success.
The tls section indicates the host to request the cert on, and the backend section indicates which backend to pass the request onto. The body-size config is at the nginx level so if you don’t change it, you can only upload a maximum of 64m even if the backend service (docker registry in this case) can support it. I have it set here at “1g” so I can upload 1gb (some docker images can be pretty large)

From the Kubernetes blog, the next version of Kubernetes has been released. And one feature has definitely caught my eye:
Windows Support (beta)
Kubernetes was originally developed for Linux systems, but as our users are realizing the benefits of container orchestration at scale, we are seeing demand for Kubernetes to run Windows workloads. Work to support Windows Server in Kubernetes began in earnest about 12 months ago. SIG-Windows has now promoted this feature to beta status, which means that we can evaluate it for usage.
So users of Windows can now hook up Windows boxes into their cluster. Which leads to an interesting case of mixed-OS clusters. Strictly speaking, that’s already possible now with a mix of Linux distributions able to run Kubernetes.
http://blog.kubernetes.io/2017/12/kubernetes-19-workloads-expanded-ecosystem.html

Kubernetes confusing you? This is a really nice short video explaining the basic concepts of Kubernetes


You must be logged in to post a comment.