You are always lectured about making backups of your systems, even more so when you are running archives from a very active mailing list. ^_^
https://www.theregister.co.uk/2018/01/14/linux_kernel_mailing_list_archives_will_return_soon/
You are always lectured about making backups of your systems, even more so when you are running archives from a very active mailing list. ^_^
https://www.theregister.co.uk/2018/01/14/linux_kernel_mailing_list_archives_will_return_soon/

This article is a guide on how to setup a Kubernetes cluster in AWS using kops and plugging it into your own subnets and VPC. We attempt to minimise the external IPs used in this method.
Export your AWS API keys into environment variables
export AWS_ACCESS_KEY_ID='YOUR_KEY'
export AWS_SECRET_ACCESS_KEY='YOUR_ACCESS_KEY'
export CLUSTER_NAME="my-cluster-name"
export VPC="vpc-xxxxxx"
export K8SSTATE="s3-k8sstate"</pre>
Create the cluster (you can change some of these switches to match your requirements. I would suggest only using one worker node and one master node to begin with and then increase them once you have confirmed the config is good. The more workers and master nodes you have, the longer it will take to run a rolling-update.
kops create cluster --cloud aws --name $CLUSTER_NAME --state s3://$K8SSTATE --node-count 1 --zones eu-west-1a,eu-west-1b,eu-west-1c --node-size t2.micro --master-size t2.micro --master-zoneseu-west-1a,eu-west-1b,eu-west-1c --ssh-public-key ~/.ssh/id_rsa.pub --topology=private --networking=weave --associate-public-ip=false --vpc $VPC
Important note: There must be an ODD number of master zones. If you tell kops to use an even number zones for master, it will complain.
If you want to use additional security groups, don’t add them yet — add them after you have confirmed the cluster is working.
Internal IPs: You must have a VPN connection into your VPC or you will not be able to ssh into the instances. The alternative is to use the bastion functionality using the --bastion flag with the create command. Then doing this:
ssh -i ~/.ssh/id_rsa -o ProxyCommand='ssh -W %h:%p admin@bastion.$CLUSTER_NAME' admin@INTERNAL_MASTER_IP
However, if you do this method, you MUST then use public IP addressing on the api load balancer, as you will not be able to do kops validate otherwise.
Edit the cluster
kops edit cluster $CLUSTER_NAME --state=s3://$K8SSTATE
Make the following changes:
If you have a VPN connection into the VPC, change spec.api.loadBalancer.type to “Internal“, otherwise, leave it as “Public”
Change spec.subnets to match your private subnets. To use existing private subnets, they should also include the id of the subnet and match the CIDR range, e.g.:
subnets:
- cidr: 10.10.10.0/23
  id: subnet-xxxxxxx
  name: eu-west-1a
  type: Private
  zone: eu-west-1a</pre>
The utility subnet is where the Bastion hosts will be placed, and these should be in a public subnet, since they will be the inbound route into the cluster from the internet.
If you need to change or add specific IAM permissions, add them under spec.additionalPolicies like this to add additional policies to the node IAM policy (apologies about the formatting. WordPress is doing something weird to it.)
additionalPolicies:
  node: |
    [
      {
        "Effect": "Allow",
        "Action": ["dynamodb:*"],
        "Resource": ["*"]
      },
      {
        "Effect": "Allow",
        "Action": ["es:*"],
        "Resource": ["*"]
      }
    ]
Edit the bastion, nodes, and master configs (MASTER_REGION is the zone where you placed the master. If you are running a multi-region master config, you’ll have to do this for each region)
kops edit ig master-{MASTER_REGION} --name=$CLUSTER_NAME --state s3://$K8SSTATE

kops edit ig nodes --name=$CLUSTER_NAME --state s3://$K8SSTATE
kops edit ig bastions --name=$CLUSTER_NAME --state s3://$K8SSTATE
Check and make any updates.
If you want a mixture of instance types (e.g. t2.mediums and r3.larges), you’ll need to separate these using new instance groups ($SUBNETS is the subnets where you want the nodes to appear — for example, you can provide a list “eu-west-2a,eu-west-2b)
kops create ig anothernodegroup --state s3://$K8SSTATE --subnets $SUBNETS
You can later delete this with
kops delete ig anothernodegroup --state s3://$K8SSTATE
If you want to use spot prices, add this under the spec section (x.xx is the price you want to bid):
maxPrice: "x.xx"
Check the instance size and count if you want to change them (I would recommend not changing the node count just yet)
If you want to add tags to the instances (for example for billing), add something like this to the spec section:
cloudLabels:
  Billing: product-team</pre>
If you want to run some script(s) at node startup (cloud-init), add them to spec.additionalUserData:
spec:
  additionalUserData:
  - name: myscript.sh
    type: text/x-shellscript
    content: |
      #!/bin/sh
      echo "Hello World.  The time is now $(date -R)!" | tee /root/output.txt
Apply the update:
kops update cluster $CLUSTER_NAME --state s3://$K8SSTATE --yes
Wait for DNS to propagate and then validate
kops validate cluster --state s3://$K8SSTATE
Once the cluster returns ready, apply the Kubernetes dashboard
kubectl apply -f https://raw.githubusercontent.com/kubernetes/dashboard/master/src/deploy/alternative/kubernetes-dashboard.yaml
Access the dashboard via
https://api.$CLUSTER_NAME/api/v1/namespaces/kube-system/services/kubernetes-dashboard/proxy/
also try:
https://api.$CLUSTER_NAME/api/v1/namespaces/kube-system/services/https:kubernetes-dashboard:/proxy/
If the first doesn’t work
(ignore the cert error)
Username is “admin” and the password is found from your local ~/.kube/config
Add the External DNS update to allow you to give friendly names to your externally-exposed services rather than the horrible elb names.
See here: https://github.com/kubernetes-incubator/external-dns/blob/master/docs/tutorials/aws.md
(You can apply the yaml directly onto the cluster via the dashboard. Make sure you change the filter to match your domain or subdomain. )
Note that if you use this, you’ll need to change the node IAM policy on the cluster config as the default IAM policy won’t allow the External DNS container to modify Route 53 entries, and also annotate (use kubectl annotate $service_name key:value) your service with text such as:
external-dns.alpha.kubernetes.io/hostname: $SERVICE_NAME.$CLUSTERNAME
And also you might need this annotation, to make the ELB internal rather than public – otherwise Kubernetes will complain “Error creating load balancer (will retry): Failed to ensure load balancer for service namespace/service: could not find any suitable subnets for creating the ELB”
service.beta.kubernetes.io/aws-load-balancer-internal: 0.0.0.0/0
(Optional) Add the Cockpit pod to your cluster as described here
http://cockpit-project.org/guide/133/feature-kubernetes.html
It will allow you to visually see a topology of your cluster at a cluster and also provides some management features too. For example, here’s my cluster. It contains 5 nodes (1 master, 4 workers and is running 4 services (Kubernetes, external-dns, cockpit, and dashboard). Cockpit creates a replication controller so it knows about the changes.

Add any additional security groups by adding this under the spec section of the node/master/bastions config, then do a rolling-update (you might need to use the --force switch), do this as soon as you can after creating and verifying the cluster updates work.
additionalSecurityGroups:
- sg-xxxxxxxx
- sg-xxxxxxxx
If the cluster breaks after this (i.e. the nodes haven’t shown up on the master), reboot the server (don’t terminate, use the reboot option from the AWS console), and see if that helps. If it still doesn’t show up, there’s something wrong with the security groups attached — i.e. they’re conflicting somehow with the Kubernetes access. Remove those groups and then do another rolling-update but use both the --force and --cloudonly switches to force a “dirty” respin.
If the cluster comes up good, then you can change the node counts on the configs and apply the update.
Note that if you change the node count and then apply the update, the cluster attempts to make the update without rolling-update. For example, if you change the node count from 1 to 3, the cluster attempts to bring up the 2 additional nodes.
Other things you can look at:
Kompose – which converts a docker-compose configuration into Kubernetes resources
Finally, have fun!

An Intel flaw that has been sitting hidden for a decade has finally surfaced.
Being on the chip rather than the OS, it doesn’t affect a single OS — with Linux, Windows and MacOS being mentioned in this article.
https://www.linuxinsider.com/story/85039.html

This article just goes through my tinkering with Kubernetes on AWS.
Create a new S3 bucket to store the state of your Kubernetes clusters
aws s3 mb s3://k8sstate --region eu-west-2
Verify
aws s3 ls
Create a Route 53 hosted zone. I’m creating k8stest.blenderfox.uk
aws route53 create-hosted-zone --name k8stest.blenderfox.uk \
--caller-reference $(uuidgen)
dig the nameservers for the hosted zone you created
dig NS k8stest.blenderfox.uk
If your internet connection already has DNS setup to the hosted zone, you’ll see the nameservers in the output:
;; QUESTION SECTION:
;k8stest.blenderfox.uk.     IN  NS

;; ANSWER SECTION:
k8stest.blenderfox.uk. 172800 IN NS ns-1353.awsdns-41.org.
k8stest.blenderfox.uk. 172800 IN NS ns-1816.awsdns-35.co.uk.
k8stest.blenderfox.uk. 172800 IN NS ns-404.awsdns-50.com.
k8stest.blenderfox.uk. 172800 IN NS ns-644.awsdns-16.net.
Export your AWS credentials as environment variables (I’ve found Kubernetes doesn’t reliably pick up the credentials from the aws cli especially if you have multiple profiles
export AWS_ACCESS_KEY_ID='your key here'
export AWS_SECRET_ACCESS_KEY='your secret access key here'
You can also add it to a bash script and source it.
Create the cluster using kops. Note that the master zones must have an odd count (1, 3, etc.) since eu-west-2 only has two zones (a and b), I have to have only one zone here
kops create cluster --cloud aws --name cluster.k8stest.blenderfox.uk \
--state s3://k8sstate --node-count 3 --zones eu-west-2a,eu-west-2b \
--node-size m4.large --master-size m4.large \
--master-zones eu-west-2a \
--ssh-public-key ~/.ssh/id_rsa.pub \
--master-volume-size 50 \
--node-volume-size 50 \
--topology private
You can also add the --kubernetes-version switch to specifically pick a Kubernetes version to include in the cluster. Recognised versions are shown at
https://github.com/kubernetes/kops/blob/master/channels/stable
TL;DL: Bands are:
Each with their own Debian image.
Assuming the create completed successfully, update the cluster so it pushes the update out to your cloud
kops update cluster cluster.k8stest.blenderfox.uk --yes \
--state s3://k8sstate
While the cluster starts up, all the new records will be set up with placeholder IPs.

NOTE: Kubernetes needs an externally resolvable DNS name. Basically, you need to be able to create a hosted zone on a domain you control. You can’t use Kops on a domain you can’t control, even if you hack the resolver config.
The cluster can take a while to come up. Use
kops validate cluster --state s3://k8sstate
To check the cluster state.
When ready, you’ll see something like this:
Using cluster from kubectl context: cluster.k8stest.blenderfox.co.uk

Validating cluster cluster.k8stest.blenderfox.co.uk

INSTANCE GROUPS
NAME                    ROLE    MACHINETYPE     MIN     MAX     SUBNETS
master-eu-west-2a       Master  m4.large        1       1       eu-west-2a
nodes                   Node    m4.large        3       3       eu-west-2a,eu-west-2b

NODE STATUS
NAME                                            ROLE    READY
ip-172-20-35-51.eu-west-2.compute.internal      master  True
ip-172-20-49-10.eu-west-2.compute.internal  node    True
ip-172-20-72-100.eu-west-2.compute.internal     node    True
ip-172-20-91-236.eu-west-2.compute.internal     node    True

Your cluster cluster.k8stest.blenderfox.co.uk is ready
Now you can start interacting with the cluster. First thing is to deploy the Kubernetes dashboard
$ kubectl apply -f https://raw.githubusercontent.com/kubernetes/dashboard/master/src/deploy/alternative/kubernetes-dashboard.yaml
 serviceaccount "kubernetes-dashboard" created
 role "kubernetes-dashboard-minimal" created
 rolebinding "kubernetes-dashboard-minimal" created
 deployment "kubernetes-dashboard" created
 service "kubernetes-dashboard" created
Now setup a proxy to the api
$ kubectl proxy
Starting to serve on 127.0.0.1:8001
Next, access
http://localhost:8001/ui
To get the dashboard
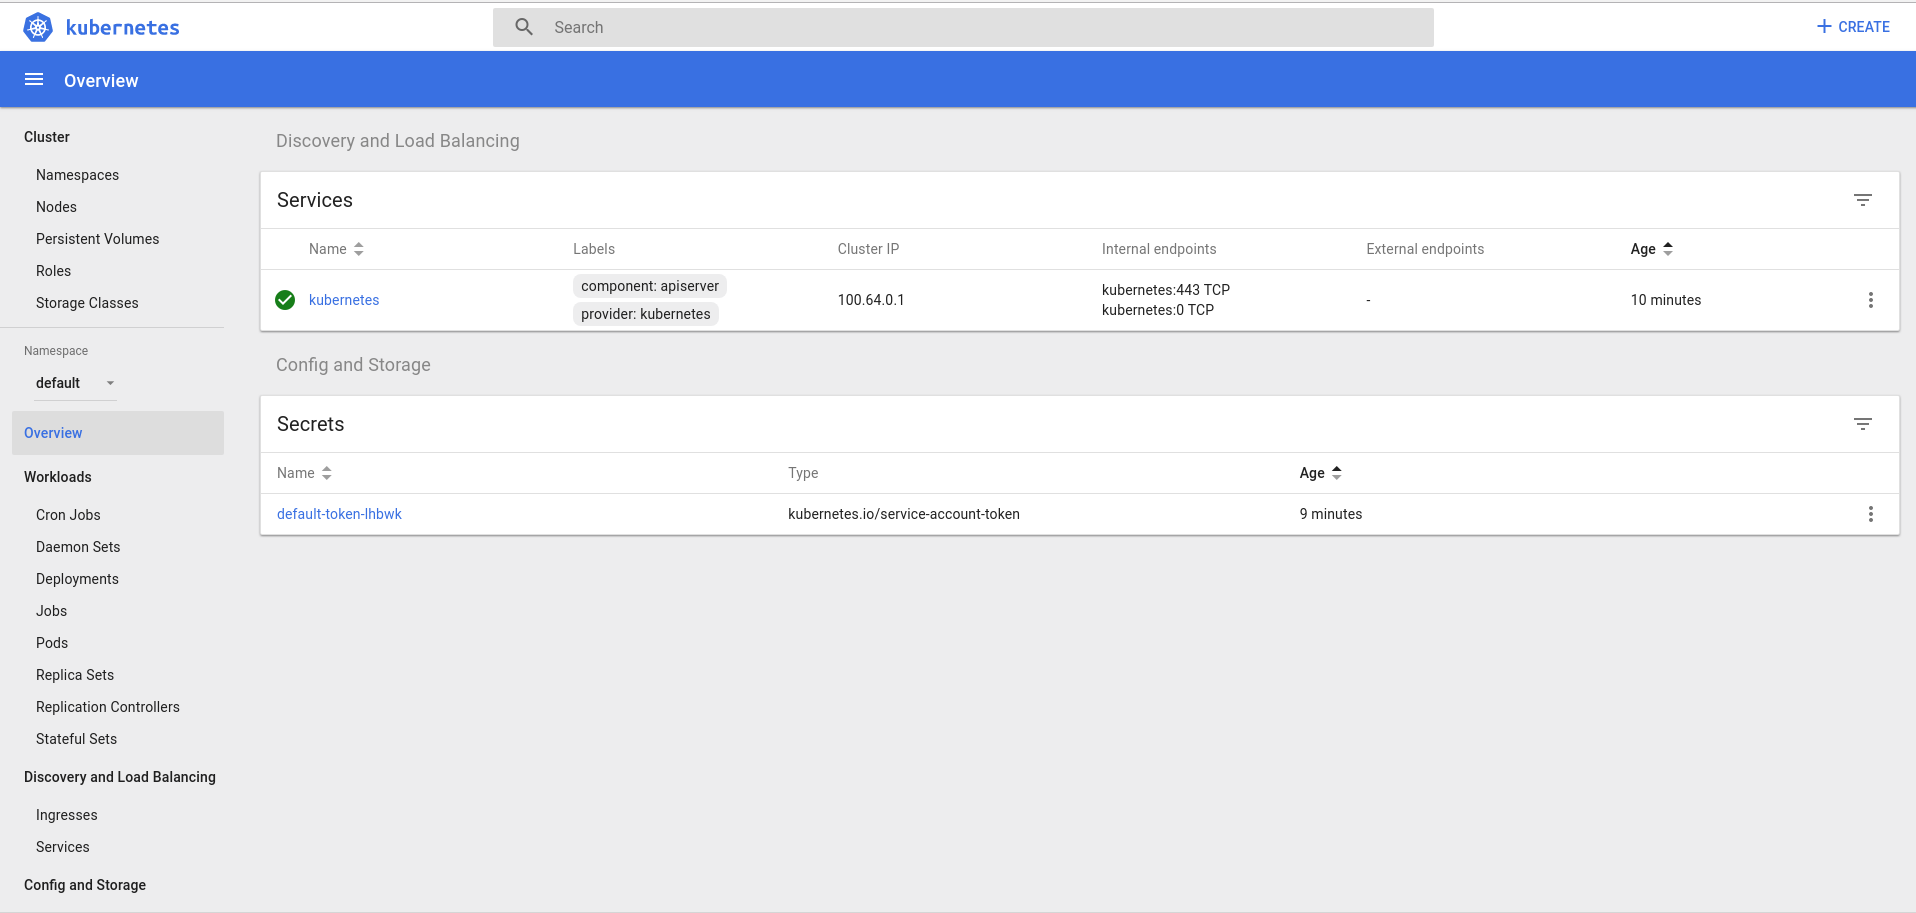
Now let’s create a job to deploy on to the cluster.

My opinion of Apple and its practices has never been high. But this is just stupid.
Type in “1+2+3=” in an iOS 11 device’s calculator app, and you get 6 (correctly), but type it in quickly (as demonstrated in this video) and you get 24.
Sure, it’ll no doubt get patched soon and Apple will twist the incident to prove how fast they can push out updates compared to Android. But the point remains – how did such a bug make it past testing? And what OTHER, similarly stupid bugs that have yet to be detected, also make it past testing. And what if one of those bugs was in something fundamental? Something that breaks the functionality of the device? Something like the 1/1/1970 bug that would brick the device, or even the infamous “effective power” bug that would annoying reboot someone’s phone. Or even the famous crashsafari site that was only meant to crash safari but managed to crash the device too (originally, anyway).
OR, was there even ANY testing?

As someone who has tinkered with multiple distributions, this will be a great way to try out multiples
 This tutorial shows you how to install multiple Linux distributions on one USB. This way, you can enjoy more than one live Linux distros on a single USB key.
Source: How to Install Multiple Linux Distributions on One USB

In the capitalistic nightmare we live in, everything has to be a transaction. So, when Pact launched its fitness app that let you make money for working out—or else pay a fee for failing to do so—it seemed to be the perfect motivational tool. There was just one problem: The company apparently wasn’t that great at paying up, and was it too good at collecting fees.
Hah, I remember this app. I actually did try it for a while but failed to see its appeal, or how it could make me continue to exercise. People would only be interested in this if they were really seriously wanting to meet a goal. People demotivated enough, would just cancel the pact/goal and continue on.
Source: App That Paid Users to Exercise Owes Nearly $1 Million for Not Paying Users to Exercise

Torvalds is not a huge fan of the ‘security community’ as he doesn’t see it as black and white. He maintains that bugs are part of the software development process and they cannot be avoided, no matter how hard you try. “constant absolute security does not exist, even if we do a perfect job,” said Torvalds in a conversation with Jim Zemlin, the executive director of the Linux Foundation.
“As a technical person, I’m always very impressed by some of the people who are attacking our code,” Torvalds said. “I get the feeling that these smart people are doing really bad things that I wish they were on our side because they are so smart and they could help us.”
Source: Linus Torvalds Invites Attackers to Join the Ke… » Linux Magazine

Another vulnerability hits the news. Whilst similar to heartbleed in leaking memory contents, it does not seem to be too risky if you’re running it as a single user, and the memory leak isn’t huge quantities.
Saying that, this vulnerability also may also affect cloud systems. For example, on AWS, (which has httpd), doing a version check:
$ httpd -v

Server version: Apache/2.4.27 (Amazon)

Server built:   Aug  2 2017 18:02:45
However, without knowing how Amazon have setup Apache behind the scenes, are we able to say definitely that we are/aren’t affected?
Source: Apache bug leaks contents of server memory for all to see—Patch now | Ars Technica

Looking forward to when LineageOS can upgrade to Oreo. There’s a lot of new features that may make life a lot easier generally. Take a look in the article for details

We take a 20,000 word deep-dive on Android’s “foundational” upgrades.
Source: Android 8.0 Oreo, thoroughly reviewed | Ars Technica


You must be logged in to post a comment.