LPIC-1
#
Finished my second LPIC-1 test. Scraped through with a thumping migraine and half-blindness, but literally, just made it. Quite a few gaps in my knowledge which I need to work on. Next step, LPIC-2
Finished my second LPIC-1 test. Scraped through with a thumping migraine and half-blindness, but literally, just made it. Quite a few gaps in my knowledge which I need to work on. Next step, LPIC-2
I have used rsnapshot a lot in the past to provide snapshots in time for my backup purposes, and I loved how I was able to to pull data from remote machines to backup locally. However, doing the reverse seemed to be a lot trickier. I wanted to push backups to a server instead of have the server pull data. Because when the server started its backup routine, some machines may be switched off. So rather than the server be responsible for backing up the clients, I wanted the clients to be responsible for backing themselves up onto the server itself.
rsnapshot didn’t seem to lend itself to easily to do this, but then I thought “why not use sshfs?”. With sshfs, I can mount a directory from a remote SSH server on the local filesystem as a directory, use that as a the snapshot root and it should work. The only downside is that since rsnapshot must run as root to do a full system file backup, it also means the sshfs must be mounted as root too, and therefore it tries to connect as root to the remote server. This might be fine if you wanted to do a full remote system backup, but enabling root SSH access is a potential security hole. Possible workaround this by making a standard user who is a member of the root or admin group (haven’t checked whether this would work yet.)
Then I found out about rdiff-backup.
rdiff, for those unfamiliar with the term, is rsync diff (or reverse diff, depending on your school of thought.) It uses the rsync algorithm (the same used by rsnapshot) to create a diff file (or delta) which, when applied to a file, can produce another file - a bit like patching using a patch file. Since we only save the differences between a file and its other version, the actual storage space is low.
rsnapshot utilises hard links to store same versions of files across multiple backups, but has a full copy of each new version. rdiff-backup stores the latest version, and stores diffs that enable you to go back to a previous point in time.
In this sense, rsnapshot works like a full backup style, storing each new version in its entirety, whereas rdiff-backup works as full-plus-(reverse) differential. Restoring from the latest backup on either tool takes the same time, but restoring from an older backup would take longer for rdiff-backup, because it would have to assemble that particular version of the files via the diff files, whereas with rsnapshot, the full version is stored (although at the cost of more space). rdiff-backup works great for files which change often, but change only slightly. Rsnapshot works great for files which change rarely, but change entirely. Using a combination of both might be a good idea (say, use Rsnapshot for /home and rdiff-backup for /var and /etc)

I am getting pretty peeved with Google recently. I have a huge amount of music on my Google Music library, so much in fact, that I hit Google’s track limit for uploads. Now, I’m trying to download my purchased music back to my machine, but their MusicManager is winding me up no end. It downloads for a while, then stops, thinking it has finished, with several tracks not downloaded. I restart the download, and it goes on a bit more then stop again.
Google suggested a few things, eventually ending up blaming my ISP. But there isn’t much alternative for me. Other than my current ISP, I can only use my corporate connection, but that requires a proxy - something Google do not support on MusicManager, or using Tor, which also doesn’t work properly. They suggested using the Google Music app, but that only works (if it ever does) on a single album.
I even tried using AWS and Google Cloud, but the app ties to MAC and refuses to identify my machine (which is a virtual machine). I also tried using an LXC contain, and that worked for a bit longer, but also died. So now, I’m trying using a Docker image. Slightly different concept, but lets see if it works.
If that doesn’t work, I’m going to try using TAILS.
EDIT: Docker image didn’t work. So anything with a “true” virtual environment such as AWS, GC, and Docker don’t seem to work (VirtualBox will probably be in this list too), anything else (LXC, e.g.) will work, but fail later.
Computerphile explains Shellshock www.youtube.com/watch

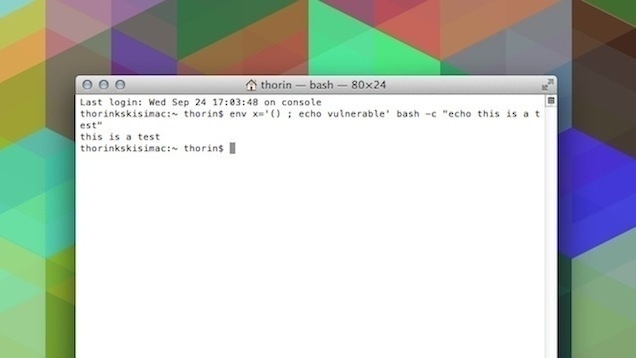
Copy-paste this line of text into a bash window
env x='() { :;}; echo vulnerable' bash -c ‘echo hello’
If the reply comes back as:
vulnerable
hello
or
vulnerable
hello
Then your version of bash is vulnerable to shellshock. Most distributions have already pushed out a new version of bash. My Ubuntu machines updated yesterday.
If you use Cygwin, then you need to check there to. Cygwin bash 4.1.10 is definitely vulnerable, but 4.1.11 is not.
If your version of bash is not vulnerable the output will be:
bash: warning: x: ignoring function definition attempt
bash: error importing function definition for `x'
hello
How To Check If Your Mac or Linux Machine Is Vulnerable to Shellshock.
NOTE: Automated 32-bit-enabled builds are now available. See this page for link details.
EDIT 29th September 2015: This article seems to be quite popular. Note that Docker has progressed a long way since I wrote this and it has pretty much broken the script due to things being moved around and versions being updated. You can still read this to learn the basics of LXC-based in-container compiling, and if you want to extend it, go right ahead. When I get a chance, I will try to figure out why this build keeps breaking.
Steps to compile and build a docker.io binary on a 32-bit architecture, to work around the fact the community does not support anything other than 64-bit at present, even though this restriction has been flagged up many times.
A caveat, though. As the binary you compile via these steps will work on a 32-bit architecture, the Docker images you download from the cloud may NOT work, as the majority are meant for 64-bit architectures. So if you compile a Docker binary, you will have to build your own images. Not too difficult – you can use LXC or debootstrap for that. Here is a quick tutorial on that.
I am using a LXC container to do my build as it helps control the packages plus it reduces the chances of a conflict occurring between two versions (e.g. one “dev” version and one “release” version of a package), plus, the LXC container is disposable - I can get rid of it each time I do a build.
I utilise several scripts – one to do a build/rebuild of my LXC container, one to start up my build-environment LXC container and take it down afterwards; and the other, the actual build script. To make it more automated, I setup my LXC container to be allow a passwordless SSH login (see this link). This means I can do a scp into my container and copy to and from the container without having to enter my password. Useful because the container can take a few seconds to startup. It does open security problems, but as long as the container is only up for the duration of the build, this isn’t a problem.
EDIT: One note. If you have upgraded to Ubuntu’s Utopic Unicorn version, you may end up having to enter your GPG keyring password a few times.
EDIT 2: A recent code change has caused this build script to break. More details, and how to fix it on this post.
As with most things linux and script-based. There’s many ways to do the same thing. This is just one way.
Script 1: rebuildDockerLXC.sh
This script does the rebuild of my LXC build environment
First, I take down the container if it already exists. I named my container “Ubuntu” for simplicity.
lxc-stop -n Ubuntu
Next, destroy it.
lxc-destroy -n Ubuntu
Now create a new one using the Ubuntu template. Here, I also inject my SSH public key into the container so I can use passwordless SSH
IMPORTANT NOTE: If you are NOT running Ubuntu Trusty, you MUST use the “–release” option. If you are running on an x86 architecture, and want to compile a 32-bit version, you MUST also use the “–arch i386” (otherwise LXC will pull the amd64 packages down instead). There is a problem with the Go build script with Utopic. Hopefully to be fixed at some point in the future.
lxc-create -n Ubuntu -t ubuntu – –release trusty –arch i386 –auth-key /home/user/.ssh/id_rsa.pub
Start up the container, and send it to the background
lxc-start -n Ubuntu -d
Wait till LXC reports the IP address of the container, then assign it to a variable for reuse later. We do this by waiting for LXC to report the IP then running ‘ifconfig’ within the container to get the IP as seen by the container. The ‘lxc-info’ command can return two IP addresses – the actual one, and the bridge, and it is not always obvious which one is which.
while [ lxc-info -n Ubuntu | grep IP: | sort | uniq | unexpand -a | cut -f3 | wc -l -ne 1 ];
do
sleep 1s
done
IP=lxc-attach -n Ubuntu – ifconfig | grep ‘inet addr’ | head -n 1 | cut -d ‘:’ -f 2 | cut -d ' ' -f 1
echo Main IP: $IP
Container is setup, take it down now.
lxc-stop -n Ubuntu
Script 2: compilerDocker.sh
This script is the wrapper script around the build process. It starts up the build container, runs the build in the container, then pulls the resulting output from the container after the build is done, extracting it to the current folder
First, check if we should rebuild the build environment. I normally do, to guarantee a clean slate each time I run the build.
echo -n “Rebuild Docker build environment (Y/N)? "
read REPLY
case “$REPLY” in
Y|y)
echo Rebuilding docker build environment
./rebuildDockerLXC.sh #If you want to rebuild the LXC container for each build
;;
N|n|*)
echo Not rebuilding docker build environment
;;
esac
Start/restart the build container
lxc-stop -n Ubuntu
lxc-start -n Ubuntu -d
Get the IP address of the container
while [ lxc-info -n Ubuntu | grep IP: | sort | uniq | unexpand -a | cut -f3 | wc -l -ne 1 ];
do
sleep 1s
done
IP=lxc-attach -n Ubuntu – ifconfig | grep ‘inet addr’ | head -n 1 | cut -d ‘:’ -f 2 | cut -d ' ' -f 1
echo Main Container IP: $IP
Now push the compile script to the container. This will fail whilst the container starts up, so I keep retrying
echo Pushing script to IP $IP
scp -o StrictHostKeyChecking=no -i /home/user/.ssh/id_rsa /home/user/dockerCompile.sh ubuntu@$IP:/home/ubuntu
while [ $? -ne 0 ]
do
scp -o StrictHostKeyChecking=no -i /home/user/.ssh/id_rsa /home/user/dockerCompile.sh ubuntu@$IP:/home/ubuntu
done
With the container started, we can invoke the compile script within the container. This does the build and will take a while.
lxc-attach -n Ubuntu ‘/home/ubuntu/dockerCompile.sh’
Now, after the build is done, pull the results from the container
scp -o StrictHostKeyChecking=no -i /home/user/.ssh/id_rsa ubuntu@$IP:/home/ubuntu/*.txz .
Take down the container
lxc-stop -n Ubuntu
Extract the package for use
for a in ls *.txz
do
echo Extracting $a
tar -xvvvf $a && rm $a
done
Done.
Script 3: dockerCompile.sh
This script is run inside the container and performs the actual build. It is derived mostly from the Dockerfile that is included in the Docker.io repository, with some tweaks.
First, we install the basic packages for compiling
cd /home/ubuntu
echo Installing basic dependencies
apt-get update && apt-get install -y aufs-tools automake btrfs-tools build-essential curl dpkg-sig git iptables libapparmor-dev libcap-dev libsqlite3-dev lxc mercurial parallel reprepro ruby1.9.1 ruby1.9.1-dev pkg-config libpcre* –no-install-recommends
Then we pull the Go repository.
hg clone -u release https://code.google.com/p/go ./p/go
cd ./p/go/src
./all.bash
cd ../../../
We setup variables for the Go environment
export GOPATH=$(pwd)/go
export PATH=$GOPATH/bin:$PATH:$(pwd)/p/go/bin
export AUTO_GOPATH=1
Next, we pull from the lvm2 repository to build a version of devmapper needed for static linking.
git clone https://git.fedorahosted.org/git/lvm2.git
cd lvm2
(git checkout -q v2_02_103 && ./configure –enable-static_link && make device-mapper && make install_device-mapper && echo lvm build OK!) || (echo lvm2 build failed && exit 1)
cd ..
EDIT see this link for extra code that should go here.
Next, get the docker source
git clone https://github.com/docker/docker $GOPATH/src/github.com/docker/docker
Now the important bit. We patch the source code to remove the 64-bit arch restriction.
for f in grep -r “if runtime.GOARCH != "amd64" {” $GOPATH/src/* | cut -d: -f1
do
echo Patching $f
sed -i ’s/if runtime.GOARCH != “amd64” {/if runtime.GOARCH != “amd64” && runtime.GOARCH != “386” {/g' $f
done
Finally, we build docker. We utilise the Docker build script, which gives a warning as we are not running in a docker environment (we can’t at this time, since we have no usable docker binary)
cd $GOPATH/src/github.com/docker/docker/
./hack/make.sh binary
cd ../../../../../
Assuming the build succeeded, we should be able to bundle the binaries (this will be copied off by the compileDocker.sh script)
cd go/src/github.com/docker/docker/bundles
for a in
ls
do
echo Creating $a.txz
tar -cJvvvvf $a.txz $a
mv *.txz ../../../../../../
cd ../../../../../../
done
And that’s it. How to build docker on a 32-bit arch.
Munich tried then ditched Linux. I wonder if Turin fares any better.
[caption id="" align=“alignright” width=“234” class=“zemanta-img”] Linux Professional Institute Logo (Photo credit: Wikipedia)[/caption]
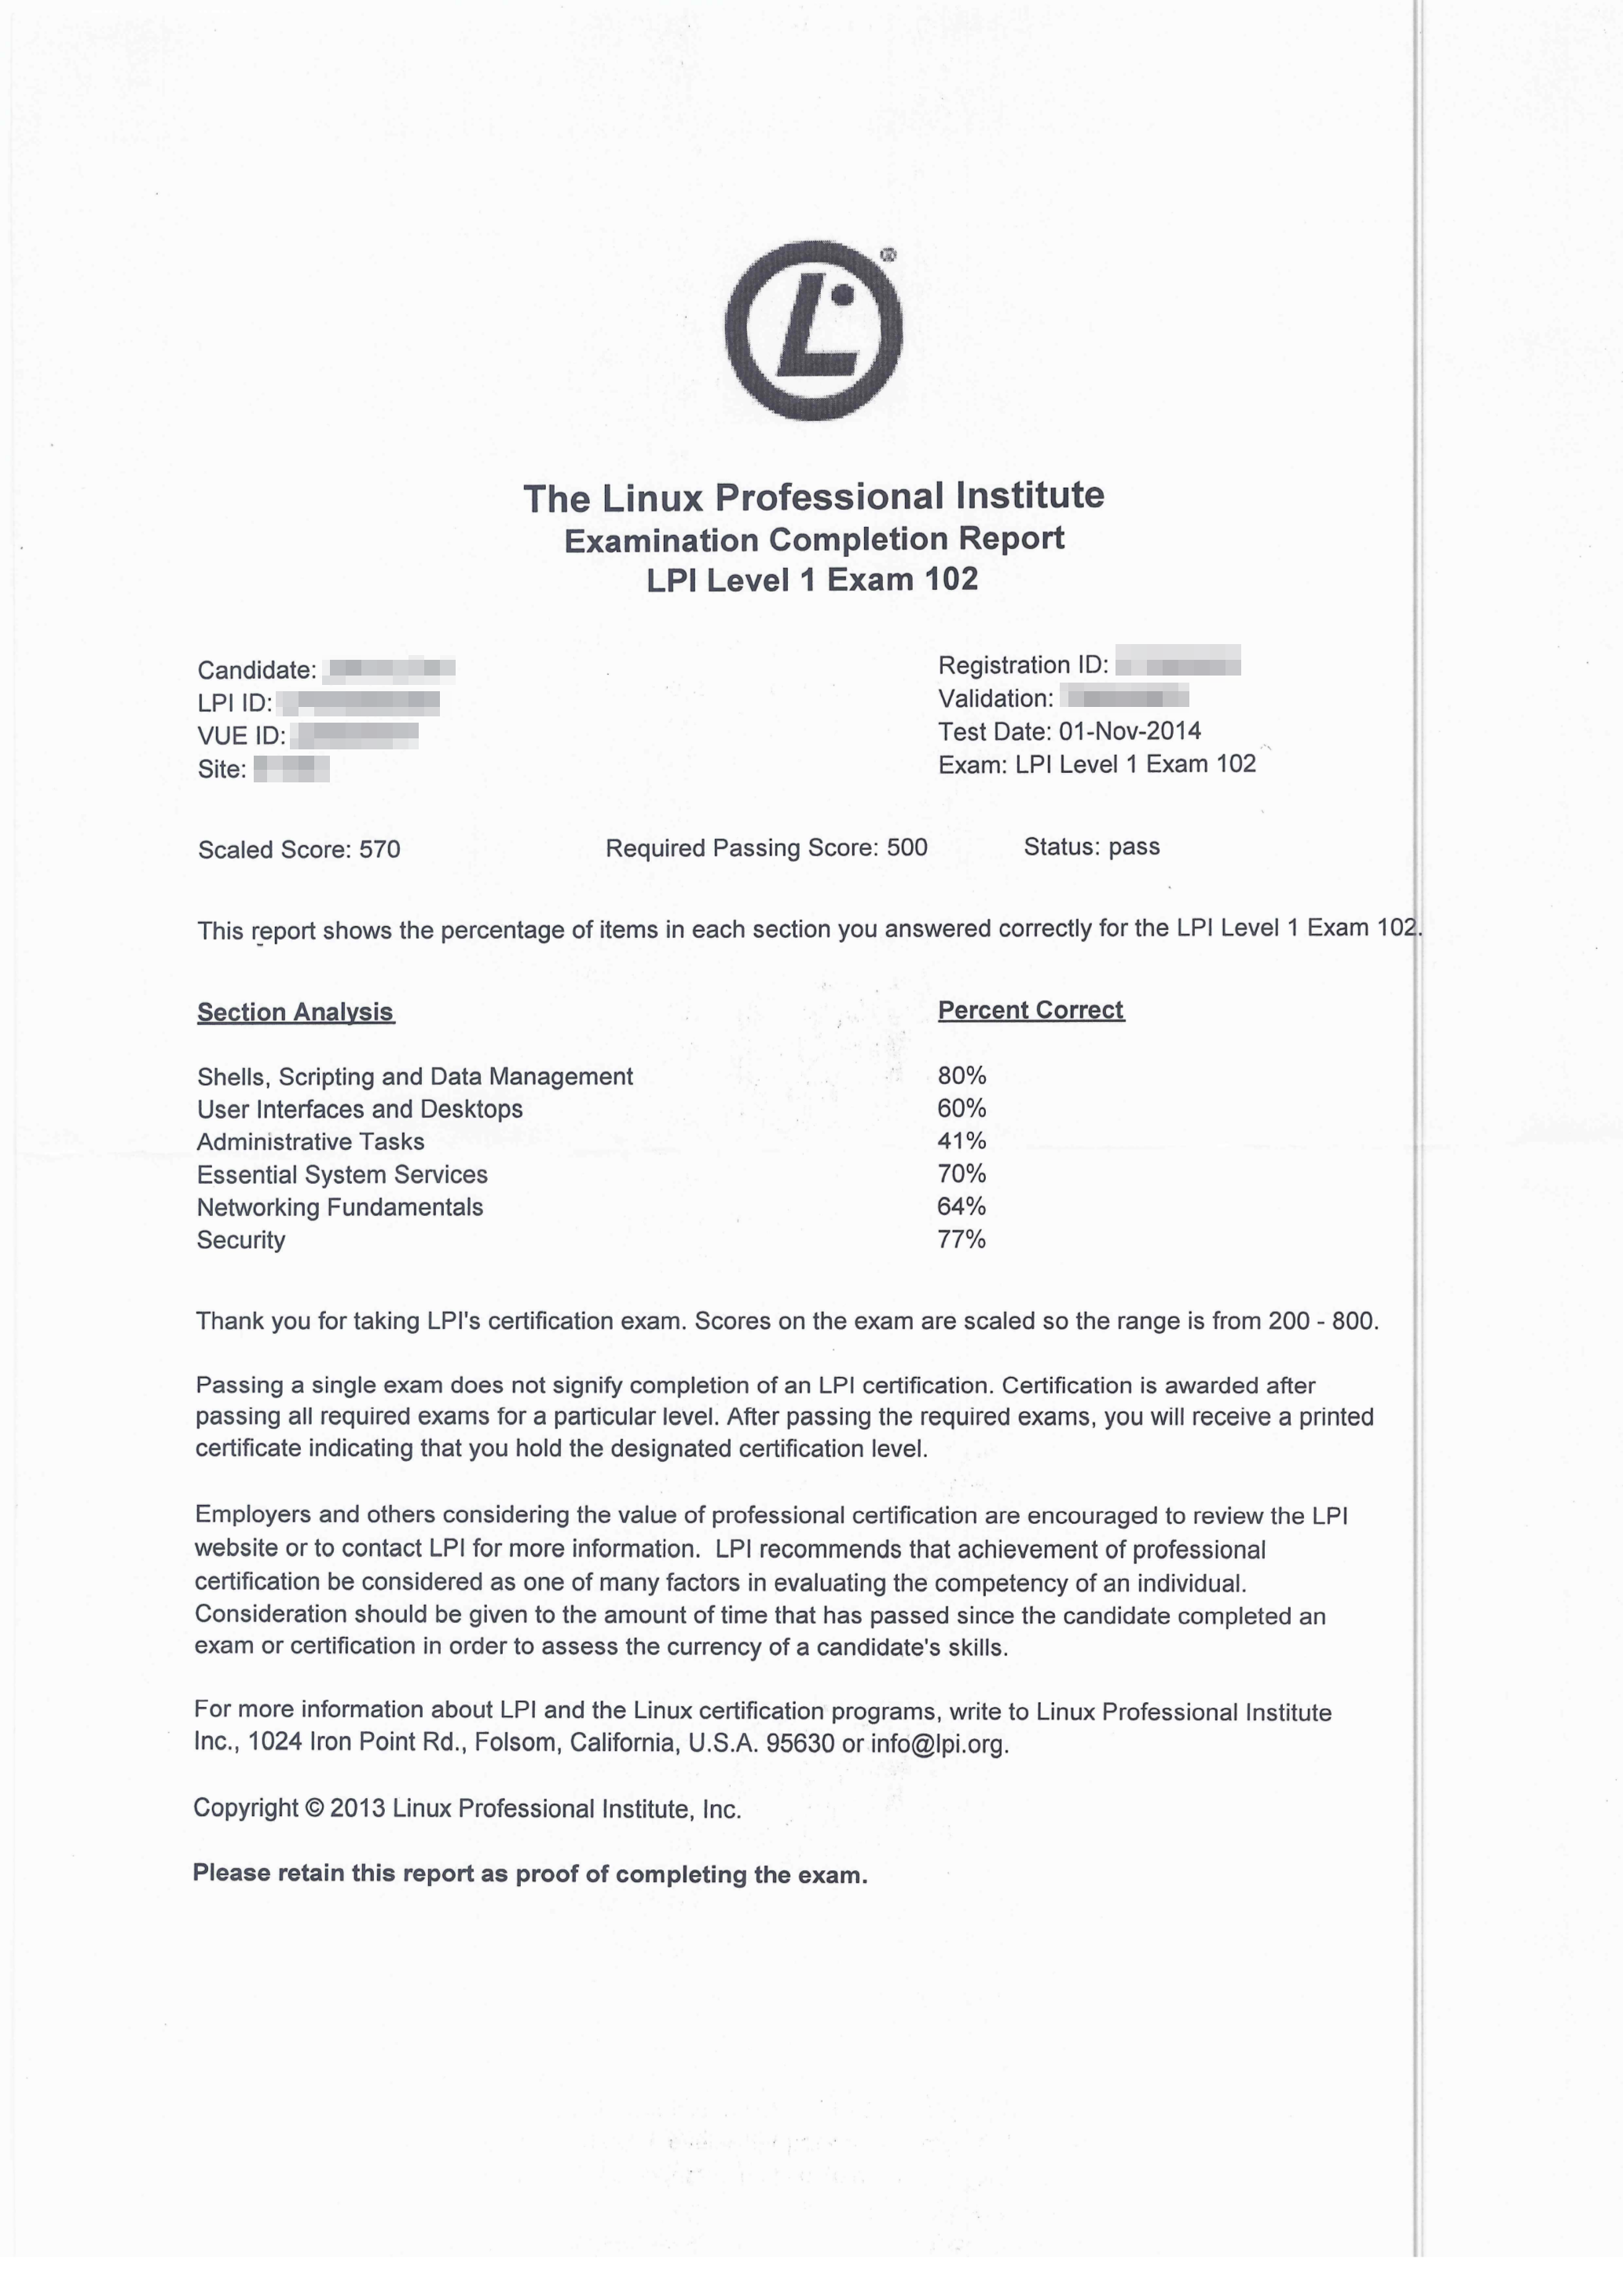
First step achieved towards LPIC-1. Part 1 complete, part 2 commence! :)
Score was 710. Pass mark was 500. Score ranges from 200 to 800, so if my score was 710/800, that makes it 88.75%. Not a bad score.
I arrived 30 minutes early, and the test centre allowed me to take the test early, although we had some troubles getting the exam started (technology, eh?)
However, once started, I clicked through the questions, and felt reasonably happy with the level of questions, even though I evidently got quite a few wrong on the System Architecture section.
I chuckled when the receptionist asked to take a picture of me to compare against the last picture (to verify I was who I said I was) and then promptly asked me “have you lost weight since the last time you were here?”
Um… I don’t think so? :P
Breakdown of topics:
I am going to see if I can find out which questions I got wrong. Would be nice to know so I can learn for future.
After much tinkering and cursing, I finally managed to get Linux Container running. I had originally wanted a Fedora container, but for some unknown reason, the container would not start. Instead, I tried a CentOS 6 container, and that started up successfully, so I am using that instead. It is actually good, because I can tinker with the CentOS container, experiment with different configurations, maybe practise setting it up as a proper (i.e. no GDM) server. This will help if I decide to go for a Red Hat-themed Linux certification.
Still bugging me why the Fedora 20 container won’t start, though.
Wow, you learn something new everyday. I’ve just found out about two variations on virtualisation. Linux Containers (LXC) and Vagrant.
Linux Containers (LXC) is known as OS-level virtualisation, meaning the kernel looks after the virtualisation, and there is no need for some extra management software along the lines of VMWare or Virtualbox. The guest OSes run as containers, similar to chroot jails, and all containers, including the main one you booted from, share the same kernel and resources as your main container. As such, LXC only supports linux-based guest OSes. You can’t (easily, anyway) run Windows under LXC. Homepage, Wikipedia.
Vagrant is a strange one. It sells itself as being a way to keep development environments consistent, and I can understand why – if you have a team of people all with a VM of the same OS, but end with different results because they have tinkered with the settings on the VM OS, Vagrant prevents this by keeping the core one in the cloud, and each time the machine is started up, it checks itself against the cloud version, updating itself if needed. That guarantees consistency. Homepage, Wikipedia.
I haven’t tried both of these tools in great detail yet, but here’s some related links for you to check out:
I’ve been tinkering with Second Life and Spotify on Linux, and discovered there’s a known bug in XDG whereby it complains when you try to access a custom protocol link (e.g. secondlife:// or spotify://) that is already registered within XDG. There’s a (rather cumbersome) way of getting around it, if you’re using Chromium (probably works with Chrome, but I haven’t tried it) First step, add a mime desktop entry - usually in ~/.local/share/application/. This entry must contain a MimeType entry, and a NoDisplay entry. Use the %u to pass the url. This desktop entry will NOT be visible on the menus, and is solely to “connect” to the application you want to invoke when the link is clicked. This example is using the Singularity viewer as an example.
[Desktop Entry]
 Name=Singularity
 Comment=Client for Online Virtual Worlds, such as Second Life
 Exec=~/.singularity-install/handle_secondlifeprotocol.sh %u
 Icon=~/.singularity-install/singularity_icon.png
 Terminal=false
 Type=Application
 Categories=Application;Network;
 StartupNotify=true
 X-Desktop-File-Install-Version=3.0
 MimeType=x-scheme-handler/x-secondlife-url
 NoDisplay=true
Next, inside the program you are calling, you may need to do some manipulation of the passed URL as it will come with escapes (e.g. %20 = space). See later in the post for an example
Finally, make Chromium aware of this new handler, by editing the Chromium preferences, found in (for the Default user), in ~/.config/chromium/Default/Preferences. Chromium must be closed for this to work, or you will lose your changes. In the Preferences file, add this block of code:
"custom_handlers": {
 "enabled": true,
 "ignored_protocol_handlers": [ ],
 "registered_protocol_handlers": [ {
 "default": true,
 "protocol": "secondlife",
 "title": "Second Life",
 "url": "x-secondlife-url:%s"
 } ]
 },
Note the trailing comma, and the url must be prefixed with the mime type you declared in the desktop entry. Start up Chromium afterwards, then click the link. When you click on the link, Chromium gets the link, finds there is a custom handler (in Preferences file), passes it to the mime desktop link you created (which contains the mime type), finds the program to use from the desktop link, and passes the url to the program using the arguments you specified.
Here’s an example of what I mean by manipulating of the passed URL. This is the script from the Firestorm Viewer. Singularity uses a VERY similar script so the code should be nearly interchangeable. I have hacked this script (changes I have made are in bold) so that it works with SLURLs (Second Life URLs) with both spaces, and prefixed with “app/region”
#!/bin/bash
URL="$1"
NEWURL=$(echo $URL| perl -pe ’s/^x-secondlife-url://; tr/+/ /; s/%([a-fA-F0-9]{2,2})/chr(hex($1))/eg;')
 URL=echo $NEWURL | sed ’s/secondlife:////g' | sed ’s//app/region///g'
if [ -z “$URL” ]; then
#echo Usage: $0 secondlife://…
echo “Usage: $0 [ secondlife:// | hop:// ] …”
exit
fi
RUN_PATH=
dirname “$0” || echo .
#cd “${RUN_PATH}/.."
cd “${RUN_PATH}"
#exec ./firestorm -url '"${URL}"'
if [ pidof do-not-directly-run-firestorm-bin ]; then
exec dbus-send –type=method_call –dest=com.secondlife.ViewerAppAPIService /com/secondlife/ViewerAppAPI com.secondlife.ViewerAppAPI.GoSLURL string:$URL
else
exec ../firestorm -url $URL
fi
I’ve been wondering how to do this. I didn’t realise I could do this in so many different ways. Simplest way, I think:
$ ls
2013.doc externalIP.txt Introduction to Compositing in Blender.txz
externalIP.sh Ideas.odt Piano to Learn
$ for a in
ls *; do echo $a; done
2013.doc
externalIP.sh
externalIP.txt
Ideas.odt
Introduction
to
Compositing
in
Blender.txz
Piano
to
Learn
$ SAVEIFS=$IFS
$ IFS=$(echo -en “\n\b”)
$ for a in ls *; do echo $a; done
2013.doc
externalIP.sh
externalIP.txt
Ideas.odt
Introduction to Compositing in Blender.txz
Piano to Learn
$ IFS=$SAVEIFS
$ for a in ls *; do echo $a; done
2013.doc
externalIP.sh
externalIP.txt
Ideas.odt
Introduction
to
Compositing
in
Blender.txz
Piano
to
Learn
$
I installed Fedora 20 and gave it a test drive. Whilst I was happy it seemed to run well, the graphics driver appeared to be flaky. Under Ubuntu Studio, I was getting a fps fullscreen using glxgears of around 60-65fps. Under Fedora, I was getting ~45 fps. I then tried Linux Mint Debian Edition, and that also had the same problem. So now, I’m back on Ubuntu Studio. But I might be vanilla Debian a go as well and see if that helps…
Some ecryptfs sites for reference, in reference to previous post.
In particular, use of the Private directory is the simplest setup as it encrypts stuff inside a known folder, leaving it in a scrambled state when you are not logged in, so that no-one can get at it.
If you only need access to those files on an occasional basis, then using the mount option is better.

With the NSA spying scandal, all eyes are on ways to stop the surveillance and protect privacy. Campaigns such as Reset the Net have been used to encourage and push sites and people to amp up their security methods. Disasters such as Heartbleed shows what happens if security is compromised, whether intentionally or accidentally
I used to use TrueCrypt to allocate a virtual hard disk and put my private files in that. One of the benefits of this was that TrueCrypt also supported full disk encryption and Plausible Deniability (e.g. hiding an OS within another OS). However, one of the most frustrating parts of TrueCrypt is that you allocate space and any space you do not use is lost. e.g. if you allocate 10GB, but use only 1GB, there is still 9GB left that allocated to the TrueCrypt volume, but cannot be used by the unencrypted space.
Unfortunately, I recently found out that TrueCrypt shut down, under very suspicious and mysterious circumstances. (check the related articles section below). Sure, you could use LUKS instead, or VeraCrypt (but I haven’t tried VeraCrypt), but considering I only want to encrypt a subset of my files, and not the whole partition, that might be a little overkill.
So, I investigated the ecryptfs. Details can be found on the Wikipedia page, but in short, it allows you to mount directories (it comes with a wrapper to the mount command), but unlike other mount wrappers, you are allowed to mount on top of the same directory. In other words, you can do:
sudo mount.ecryptfs ~/SecuredData ~/SecuredData
And this will take the data stored in the directory and transparently decrypt it when you try to access the directory.
If you copy data into the directory, ecrypt will encrypt it and store it in the underlying directory in an encrypted manner. When you unmount the directory, only the encrypted data is visible. If you combine the mounting process with the optional Filename Encryption, then all you see are files with garbled filenames.
ecrypt supports various encryption methods, from AES and Blowfish, to 3DES and Twofish. Obviously, the higher you choose the encryption level, the slower the access. 3DES encryption resulted in a transfer rate of 7MB/s for me, when copying to the encrypted space, and AES was 16MB/s, so balance your requirement of high encryption vs slow access.

![]()


I dug out my Wacom Bamboo Graphics Tablet and plugged it into my Ubuntu Studio installation, but frustratingly, I cannot seem to emulate a wheel scroll, which I need for my work in Blender. Sure I can use the keypad +/-, but that isn’t the way I’m supposed to work.
I might switch over to Fedora later this week and see if that is any better. Or maybe even put Linux Mint back on. I know that both have gone through new versions since I last used them. Fedora was at Schroedinger’s Cat / Version 19 and Linux Mint was at Maya / Version 13 last time I used it.
Now may be a good time to start looking at other distributions. openSUSE seems appealing, but it has caused me problems with restoring from CloneZilla images in the past, especially cross-operating system.
![]()

Could this be a sign of an exodus away from Windows-based environments? The cost of having to upgrade many machines to Windows 7 or Windows 8, not to mention support and licensing, or the premium support cost required to continue supporting Windows XP would not go down well at any sensible company’s finance/accounting department.
Linux is free, open-sourced (see this link for a video explanation of what the term “open-sourced” means), and if a user doesn’t like how it works, they can add/remove or tweak it completely to their liking. They can even build their own kernel to handle bespoke hardware if they wished.
It should be noted that HP teamed up with Bell Labs in the past (who developed the original UNIX OS, on which Linux was inspired from), and built HP-UX (source here), so it isn’t like HP haven’t got some *nix-like environment already under the hood. In fact, WebOS (now looked after by LG, but originally developed by Palm, which was then acquired by HP, then sold to LG) was Linux-based (source here).
HP, which was actually one of Microsoft's key partners in the last decade, is trying to move away from Windows in a move that would clearly turn the company into a direct competitor for the Redmond-based software giant.
HP Stabs Microsoft in the Back: Dumps Windows, Prepares Linux-Based Operating System.
")
A quick snippet for syncing your date and time via NTP. I have noticed that Windows and Linux do not follow the same convention by standard, and are always an hour out from each other, even though both claim to follow the same time zone. So, what I am having to do is sync via NTP each time I dual boot.
In Linux, this can be done using cron jobs or using the NTP daemon, but that does not do it frequently enough for my liking. So here is a bash snippet for it:
sudo service ntp stop
sudo ntpdate 0.ubuntu.pool.ntp.org 1.ubuntu.pool.ntp.org 2.ubuntu.pool.ntp.org 3.ubuntu.pool.ntp.org 0.uk.pool.ntp.org 1.uk.pool.ntp.org 2.uk.pool.ntp.org 3.uk.pool.ntp.org ntp.ubuntu.com
sudo service ntp start
The first line stops the NTP daemon, since the ntpdate command does not like it when it is running (port in use). The second command uses a server in the selected list to sync with. The final line restarts the NTP daemon.
The Windows (Windows 7) equivalent is very similar. Like with linux, it has an in-built sync facility, but it again does not sync often enough for my liking. Like with the bash script, the commands must be run with elevated rights, so you must “Run as Administrator”, or run from an elevated rights command prompt, which you do as follows:
net stop “Windows Time”
net start “Windows Time”
w32tm /config /manualpeerlist:“0.ubuntu.pool.ntp.org 1.ubuntu.pool.ntp.org 2.ubuntu.pool.ntp.org 3.ubuntu.pool.ntp.org 0.uk.pool.ntp.org 1.uk.pool.ntp.org 2.uk.pool.ntp.org 3.uk.pool.ntp.org ntp.ubuntu.com” /syncfromflags:ALL /update
w32tm /resync
This code starts/restarts the Windows Time service then configures it with a pool of NTP servers, before asking the service to update itself and then resync. The resync action is what adjusts the time.

I’ve just finished work on a dual-boot setup guide with Linux and Windows 7. It covers setting up Dual Boot with Windows installed first or second, and with Linux installed first and second, and covers Linux distros that default to using LVM, such as Fedora, and those which don’t default to using LVM, such as Debian.
Link here:

![]()
The recent linux kernel update has screwed up my admin accounts on both my Ubuntu-based boxes (Lubuntu & Ubuntu Studio). I’ve spent three hours creating a new user, making them sudo-enabled, then moving my files from my old profile to my new one and tinkering with a few scripts and desktop shortcuts that were still pointing at the old home directory.
Mind you, it’s given me an opportunity to test my LPIC-1 knowledge.

If you rely on remote access to your home computer but cannot be bothered with having to record your external IP each time then you can use DynDNS or No-IP, but they rely on installing their own tools to update their systems, and in some cases, want you to pay for the service. I have found a (somewhat convoluted) way of an alternative means, which should work under most Linux environments.
IP=wget -q -O - checkip.dyndns.org|sed -e ’s/.Current IP Address: //' -e ’s/<.$//'
HOST=host $IP | cut -d ' ' -f5
echo $IP $HOST | tee externalIP.txt
grive
echo ‘cd {path-to-your-grive-folder};./externalIP.sh’ | at now + 2 hours
chmod +x externalIP.sh
$ ./externalIP.sh
XX.X.XXX.XXX your-hostname.
Reading local directories
Synchronizing folders
Reading remote server file list
Detecting changes from last sync
Synchronizing files
sync "./externalIP.txt" doesn't exist in server, uploading
Finished!
warning: commands will be executed using /bin/sh
job 278 at Tue May 6 22:48:00 2014
What the script does is determine the external IP address of your machine, do a reverse lookup on it, write the results to a text file, then sync it with Google Drive. What you can do is read the text file (externalIP.txt) off your Google Drive storage via the web interface at http://drive.google.com, and you can then access it remotely, using either the IP or the hostname. The last line schedules the script to be run again in two hours from now (in case your IP address changes), this is the “job 278” line.
It should also be noted that the scheduling carries on between reboots.

Something I’ve been saying for a LONG time…
I’m one of those people who hates having to shutdown machines, then restart them, and start logging into all my sites all over again, so I’m particularly thankful for hibernation functionality.
On Ubuntu (possibly Debian as well, but I haven’t checked), you can install either (or both) of the hibernate package, or the TuxOnIce-enabled kernel.
Hibernate is a script that detects whether or not you have a TOI-enabled kernel, and if you have such a kernel, it will use the TOI routines.
Hibernate worked perfectly for me, until I started using BOINC. Then, hibernation would hang with my laptop in a “limbo” state. Neither fully on, nor fully powered off. Turns out that BOINC must be either hogging the memory, or not releasing it properly. So, instead of doing
sudo hibernate
I do this
sudo service boinc-client stop
sudo hibernate -k
sudo service boinc-client start
So I stop the BOINC service (freeing up memory and CPU cycles), then I do the hibernate (allowing it to kill processes if needed), and then I startup the BOINC service again. The last line only gets executed upon resuming.


